Wednesday, July 14, 2010

When bad nail polish goes, well, bad.

Even stronger than my love for green nail polish is my inability to resist a gimmick. When MAC put pictures of Disney characters on the packaging of a lipbalm of theirs I really didn't like, I bought it. When Too Faced released a line of Smurf-themed products, I was first in line to get that blue glitter eyeliner that now languishes in my collection. You get the idea. So, when I was at God's gift to hip, financially strapped young adults, Five Below (a place where you can buy one of the coolest nail polish collections ever, LA Girls Rockstar, incidentally, and everything is under $5) and saw the cheap boxes of candy-themed nail polishes that smelled of said candy, I couldn't resist. My friend Amanda was there. She will tell you I was like a moth to a flame. I mean, look at it! Fun Dip nail polish! What could be more cool?

This is where we have to be honest with each other, though. Usually I always find something positive about a nail polish. It was a nice color. It dried well. The application was smooth. It had staying power. Well, I want to have a post where I tell you: the only thing that was fun about this polish was buying it. I picked a pretty good picture to show you the polish, but in reality, it was a horrific experience. I know what you're going to say. Come on, girl, it's Fun Dip nail polish. What do you expect? And I know you're right. But just for fun, let's pretend I expected this to be not awful, okay?

I chose the Mean Apple Green polish to take the set for a test drive because I love green. In the bottle, it actually looks like it might be a bright green creme with silver shimmer, but on the nail it was pretty much a grass green frost. It looks okay here, but those streaks you see? Brush strokes. And this puppy was chock full of them. The application was streaky, and even after four coats, there is still visible nail line. But then I thought, hey, that happens, usually all you need is a little top coat, and all will be well. Wrong. That was when the real fun began. Seche Vite can dry just about anything, but two hours after I did this, the very edges of my nails were sticky. When I woke up this morning, the shrinkage (which is when fast dry top coats dry well in advance of the polish underneath them and pull back from the nail tip, leaving what looks like tip wear) was horrendous. And guess what? It wasn't dry! I can still dent it with my nail! It's been 24 hours, and to amuse myself right now I am denting it with my thumb nail! It does smell like synthetic sour apple, though, which is fun.

And don't tell me it's because it's cheap (this is sold at Five Below for $5 for the box of six polishes). Wet 'n' Wild Wild Shines are $.99, and they are freaking fantastic. And don't tell me it's because it's for kids. Kids deserve fun nail polish too! This is a disgrace to nail polish gimmick fans everywhere. It's like they literally dumped actual Fun Dip into clear polish and boxed it up for sale.

So before the awfulness of this drives me crazy, I am taking this off immediately and putting something on less terrible, because I am here to bring Polish to the People!

Monday, July 12, 2010

Deborah Lippmann Lady Sings the Blues

Every year for their anniversary, Nordstrom has a big anniversary sale, and as a part of that sale, different cosmetics companies will release some kind of collection, special product, or Nordstrom exclusive shade to celebrate, well, one of my favorite stores in the world. Deborah Lippmann, a pretty nice department store polish brand, has been taking that opportunity for the last couple of years to bring us some very fun glitters - some, not all, like last year's Funky Chunky which looked about as yummy as it sounds. This year, they released just for Nordstrom's use a set of three polishes called the All That Jazz collection as well as two other polishes (I believe all of these will be available on Lippmann's website later in the year), all of which are like glitter orgasms.

I just got the set in the mail last week, so after the LiLo manicure, I had to break into it immediately, and out of the three colors, a blue with chunky silver glitter, a magenta with magenta glitter, and a rose glitter in a clear base, I had to go for the blue. I am a glitter H00R.

Lighting was not my friend today, but here is this stunner, Lady Sings the Blues. It is a deep blue base filled with silver glitter, both small and large pieces of hexagonal glitter. Some people hoped it would look like the elusive Essie Starry, Starry Night; it doesn't really, but it does look like SSN's loud-mouthed cousin, so if you want a blue jelly with some kind of silver glitter, this is your girl. What really wowed me about this shade was the application. I will expound on what it means to be a jelly polish in a moment, but usually jelly polishes require several coats before you can no longer see the nail line beneath it, but not this bad boy. I am a serial three coater, and I simply couldn't justify more than two coats. It applied smoothly and dried very nicely with a coat of Seche Vite. Now, what do I mean by jelly?

This is a little lesson for the people out there who are not as, shall we say, totally crazy about nail polish as I am. A favorite finish among nail fanatics is the jelly finish, which I am demonstrating above by holding jelly (actually it's preserves, but I don't think too many Americans make much of a distinction). You know how jelly is sort of transparent, but you can't actually see through the jar when you look at it? And, depending on the jelly, sometimes you can't even see through it when you put it on toast? But you know, somehow, that the light penetrates it somehow so that it can't be totally opaque? That's what we mean by jelly nail polish. The light penetrates it giving it a kind of squishy appearance, but it isn't necessarily clear or sheer. Some jellies are a little easier to deal with than others. This is by far the best in terms of coverage. Lippmann has some other very problematic jellies like Rehab which is named for a fantastic song and a pretty color, but took me seven coats the last time I tried it to get it to the opacity that I like. And even for me, that's not cool.

So, yeah, I love this polish. It is the awesome. Polish to the People!

Saturday, July 10, 2010

Lindsay Lohan Jail Nails Inspired Nail Art!

The nail polish obsessed world has been abuzz the last several days following Lindsay Lohan's sentencing. She was sporting a very interesting manicure that garnered additional attention because one nail advertised a subtle yet profane message to the court. Of course, we all wanted to do our own interpretations, sans message. You can see a pic of the manicure here.

Obviously, my version is only inspired by Lindsay's (mine is far more pastel), which we believe was airbrushed, and also inspired by the interpretations of other lovely ladies on the Makeupalley Nail Board. This required a shocking 10 coats of polish, but hey, such are the things we do for polish! Here is a pic of the tools, in order of application from left to right:

After basecoat, I applied three coats of Essie Ballet Slippers. I could have gotten away with two given how much went over it, but this polish is so streaky, I had to go the extra mile. After that, I randomly brushed splotches of OPI Do You Lilac It?, Orly Lemonade, Funky Fingers Daiquiri on Deck, and China Glaze For Audrey. I would have been much closer to my inspiration had I used a sponge instead of the brush, but, well, I wasn't that dedicated! Then, to soften the lines, I applied two coats of Essie Tennis Corset (what the heck is a tennis corset, anyway? Wouldn't wearing a corset while playing tennis be horribly uncomfortable?). Finally, I added a little Konad with Konad white Special Polish to get something like the pattern on Lindsay's. Here is the final product:

I haven't had a chance to clean it up completely yet, so that crap around the cuticles is polish, not nasty skin. Sorry about that. Anyway, I rather like it, to tell you the truth. Hopefully it won't turn me into a crazy person. I am, of course, holding the Mean Girls DVD. I actually show this movie almost every year in the university sociology class I teach because it is filled with sociological themes, but I am holding it here to remind us of the sweet girl Lindsay used to be. What a shame.

And that's all for today, folks! I expect my next post, either tomorrow or Monday, will be one of the polishes from the Nordstrom exclusive Deborah Lippmann collection, All That Jazz. Because I just got the set and it is all glitters, and I am a glitter h00r. Polish to the People!

Thursday, July 8, 2010

Glitter Party!

I have been feeling kind of blah lately, so I figured that nothing could perk me up like a little glitter. Okay, a lot of glitter. First, I have to admit that this combination was not my idea. I stole, er, borrowed it from some lovely ladies on the Makeupalley nail polish board, theasiangirl, who came up with the original idea, and then minnnnie, who brought it to life on her nails! On to the pics! Apologies in advance for the nasty cuticles, but what can you do?This look requires a shocking four different nail polishes. The base color is the sexy bottle I am holding here, Nfu-Oh #61. This is one of those nail polishes that you have to really be a fanatic to know about. It is made in France, sold in New Zealand, and available in the US from one etailer. This brand makes some of the greatest flakey glitter polishes in existence. This is another beauty of theirs, their basic silver holographic polish. In my version, the glitter sort of obscures the holo effect, but that's always a risk with layering. Isn't that one of the sexiest nail polish bottles you have ever seen? It has corset detailing on the handle! Anyway, one notorious problem with holos is application, and this is no exception. Because it is made of teeny tiny bits of holo glitter, it has a tendency to leave bald spots in not just the first, but subsequent coats. You have to use a good basecoat, and, in my experience, let it dry all the way before carefully applying coats of the holo. This worked pretty well over Gelous basecoat (available at Sally Beauty Supply), and dried very quickly.


Over the holo are three different glitters, two of which are pictured. The first is the bottle on the right, OPI Mad as a Hatter, part of the Alice in Wonderland collection. It is chock full of multi-colored glitter, with the purple and silver the most obvious. There is blue, yellow, green, pink and orange in there also. It is a real pain to remove (it requires the glitter removing tub of doom I have mentioned before), but pretty awesome. Over that, one coat of the polish on the left, Deborah Lippman Happy Birthday, which is chunky multi-colored glitter, basically the bigger, badder sister of Mad as a Hatter. You have to be very precise when applying this so you get enough glitter on your nail, but it is fantastic. Finally, I put a coat of China Glaze Fairy Dust, which is a topcoat of holographic glitter. Because, at that point, why not?

This actually dried very well and has worn very well. I type for a living, and after a whole day, as you see, there is no tip wear. I can't stop staring at the crazy, glittery goodness! I hope you enjoy, and Polish to the People!

Saturday, July 3, 2010

July 4th Mani

I know, I've been MIA and I never posted that neutral mani I promised. I just couldn't. It was.... unsightly. Then I got an airport mani on my way home from the trip that required the neutral mani because I couldn't handle the sheer polish anymore, and that wasn't really worthy of posting either. So I decided to come back with a bang!

American Independence Day is one of those great holidays that just beg you to come up with some obnoxious, over-the-top manicure with glitter and nail art. Other such holidays are Christmas, Halloween, and the first day of football season.

As such, there's a lot going on with my July 4th mani. It's got an accent finger, it's got Bundle Monster, and it's got glitter. It's also a combination of easy to find, not so easy to find, and hard to find polishes, because if I don't show you something it's almost impossible to get, how will you know to look up to me?

Okay, on to the manicure. For this monstrosity, for the majority of my fingers, I used a white base, OPI's The Ghostess with the Mostess, the glow in the dark treat from OPI's 2008 Halloween line. As a consumer, you could only get a mini of this, and only nail professionals got a complimentary full-sized bottle, so if you could find a nail professional with loose morals, you could get a regular bottle of this. Which I did. So, as you can imagine, it's very difficult to get now, but honestly the only reason I used it is that it was the only white I have. Yes, that's right: I, crazy nail polish maniac, have no white polish. Like other whites, it is streaky and somewhat difficult to work with, but it does glow in the dark (pretty well, actually), and it served its purpose.

Over the white is Untold by Illamasqua, which I bought this week when I had the chance to go to one of the few Sephoras in the US who carry it. I was always attracted to this primary red glitter when lusting after Illamasqua, and now it is mine! This is one coat, so if you wanted this to be opaque, you'd probably be looking at three coats or so. Like all Illamasquas, this was perfection.

For the ring fingers, I pulled out an old stand by, China Glaze Frostbite. It's a nice shimmery, bright, primary blue, and it actually applies and dries pretty well. I have a very hard time wearing China Glaze because of application, drying, and wear issues, but this one isn't actually too bad. The ring fingers also feature a Bundle Monster pattern in Konad white Special Polish.

Pretty festive, eh? Freedom and Polish to the People!

Saturday, June 26, 2010

Ulta Professional After Hours and a Word on Smurf Fingers

Today I have a picture and review of an Ulta Professional polish and then a word or two of nail polish removal advice for the people. So let's dive right in!

I had a very long and trying week, so I uncharacteristically left on my Funky Fingers Alice mani for a shocking three days, and I can report that the wear was excellent. I only started getting chipping on the finger currently sporting a patch over a split, and that isn't really the polish's fault.

The day I finally did get myself to change, I went with an old standby of laziness, the dark nail polish. Why the standby of laziness, you may ask? When I do not want to put a lot of work into removing polish to make a clean slate for the next color, I do it half-heartedly and make up for it with a dark color. The reason for this is Smurf fingers, which I will explain shortly.

This is a color called After Hours from a set of Ulta Professional minis called the Glam Goth collection (so, those of you who know me personally know that I was obligated by all forces natural and spiritual to buy these minis), so it can't be purchased on its own. Because there is no such thing as too much nail polish, I do not see this as an obstacle to its purchase. I used a flash picture for this color to really capture the sparkle in the dark blurple (nail polish lingo for a bluish purple) base. In bad lighting, this looks almost like a creme, but get it in some good light, and hello tons of blue and red shimmer! Like the other colors in this set, this is a truly stunning shade.

The one problem I did have with it is the brush. Now, I love the OPI Pro Wide brush, which many find to be way too wide, so I thought I would like this one. This brush is just about the same as the OPI, but somehow... different. Maybe it's fuller, or thicker, or maybe because it's on a shorter base, but I found it a bit unwieldy which accounts for the funky application around my cuticles. The good news is that even I, a serial, unapologetic three coat evangelist, only needed two coats for total opacity, which is good since the bottle is so small! I know, I say this like I will ever run out of it.

Now, a word on Smurf fingers. Smurf fingers are what occur when you remove a stubborn blue polish. There are alternative versions of this with other colors, notably red and neon pinks, and the concept is the same. When you try to remove the color with remover, it stains the skin around the nail, so you end up with tinted fingers that can ruin the look of your new manicure. You can't see it very well in this picture, but the cuticles on most of my fingers are blue from Alice, and all because I didn't do such a stellar job of removing it. If I had wanted to paint my nails with a pastel after and not have the horrible blue cuticles, I would have employed one of the following methods:

1. Nail polish removing tub of doom: At Target, you can buy this fabulous device that looks like your standard sponge in a tub remover, but is so much more. Instead of a sponge, it is a hole, not unlike the sarlacc pit in Jedi, surrounded by plastic bristles. It is filled with pure acetone, so not for the weak-willed. You stick your finger in, let the acetone dissolve the polish, and then scrub it off with the bristles. This thing is fabulous for glitter and dark polishes.

2. Protect the skin first: Alternately, you can slather your fingers and cuticles with cuticle oil or a heavy cream before using your standard removal method. Like putting vaseline on your forehead before dyeing your hair, this acts as a protective barrier and prevents the disintegrating polish from sticking to your skin.

I hope this dissertation helps someone else removing a dark nail polish. Keep an eye out for a truly shocking post I expect to make tomorrow when I put on a sheer, neutral nail polish! The humanity! Until then, Polish to the People!

Tuesday, June 22, 2010

Funky Fingers Alice with Bundle Monster

I've been promising Bundle Monster nail art for so long that I figured I had better deliver! Last night I played with the plates for the first time since getting them, and I managed to do so without slicing my hand open on the sharp plates, so yay me! Still, if you get them, be very cautious with the sharp edges!

First up, the base color for my nail art, Funky Fingers Alice.

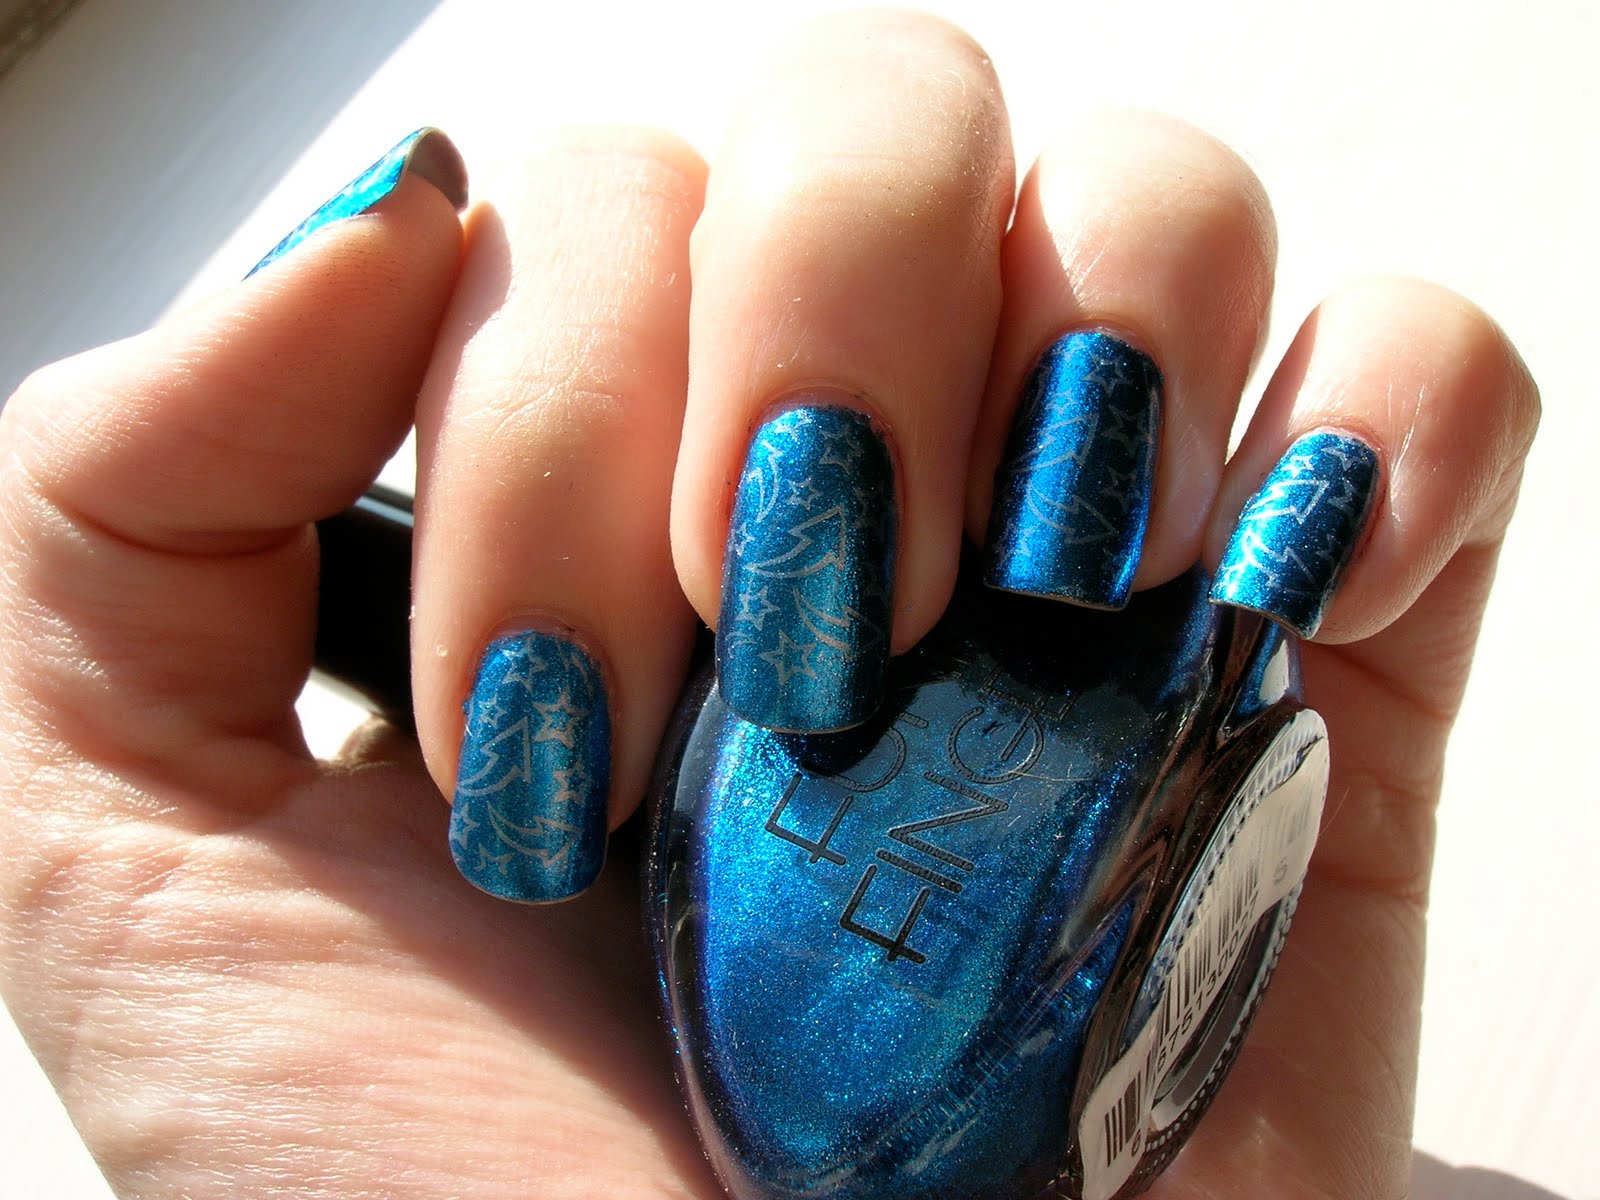
This picture shows the actual color of Alice better than the next, so I wanted to start with it. I've accidentally been on a big Funky Fingers kick lately, and am glad I have been! I bought this color a while ago but never wore it. It was part of an Alice in Wonderland collection. I originally thought it was supposed to be a dupe of OPI's Absolutely Alice, but other than being blue, it really isn't. Where Absolutely Alice sports tons of blue and silver glitter, the Funky Fingers Alice is so jam packed with blue and silver micro glitter that it looks like a metallic. It is so sparkly in the sun, as you see. As with all Funky Fingers I've tried, this applied well, though it did leave a couple of bald spots with the first coat. I used three coats to get this as opaque as I usually like it.

Now for the Bundle Monster nail art. This is from the plate I showed you in the post when I first got the plates, which I believe is #20, a full nail design plate. As I mentioned, the patterns are a little on the narrow side, so this pattern did not fully cover either of my thumbs, especially my right thumb which is noticeably wider than the left. Am I a freak, or do other people have this issue? Anyway. The patterns are also noticeably more shallow, but even with a pattern like the above with thin lines, it wasn't too big of a deal. I used Konad Special Polish in Silver for the design. I know everyone else uses different brands of polish for their nail stamping, but I have always had the best luck with the Konad polishes. They are thick and dry slowly, which is good for the quick action needed for nail stamping, and the brush is very short and stiff, which is good for getting a good coat of polish on the plate.

I hope you enjoyed the nail art. Until next time, Polish to the People!